yuu_nkjm blog
2009-07-20(Mon) 編集
[Pukiwiki] pukiwiki(PukiWiki Plus!)のまとめ
pukiwikiのグローバル設定の注意
グローバルな設定をpukiwiki.usr.ini.phpに書いている.例えば,以下の様な設定である.
// PLUS_ALLOW_SESSION - Allow / Prohibit using Session
define('PLUS_ALLOW_SESSION', 1);

// 認証せずには閲覧できない
define('PLUS_PROTECT_MODE', 5); // 0,2,3,4,5
pukiwiki.ini.phpの設定を変更しても有効にならないなーと思った時はここでハマっていないかをチェックする.
導入しているプラグイン
Pukiwiki Plus!とmonobookというものを使っている.sonots'さんのプラグインを多く導入している.
[ツッコミを入れる]
2011-07-20(Wed) 編集
[サーバまとめ][openSUSE][fail2ban] fail2banのまとめ
既存のサーバから移行する場合
-
基本的には,jail.confだけコピーすればOK.独自のフィルタや独自のアクションを追加していたら,action.d/やfilter.d/もコピーする.
cp -a /prev/etc/fail2ban/jail.conf /etc/fail2ban
新規インストールの場合
- yastでインストールする.
- fail2banサービスを起動する(/etc/init.d/fail2ban start)
- fail2banサービスの自動起動の設定する.(chkconfig fail2ban on)
-
jail.confの設定.重要なのは以下.
[DEFAULT]
# banしないIPアドレス
ignoreip = 127.0.0.1 192.168.150.0/24
# 禁止する時間
bantime  = 60000
SSHのアクセスに基づいてbanする.[ssh-iptables] # チェックのオン・オフ enabled = true filter = sshd action = iptables-allports[name=SSH] sendmail-whois[name=SSH, dest=hoge@nkjm.info, sender=fail2ban@nkjm.info] # sshのログの場所の指定 logpath = /var/log/messages - [apache-tcpwrapper]もenable=trueにしても良いかも.
TIPS
フィルタのテスト
- "fail2ban-regex /var/log/messages /etc/fail2ban/filter.d/sshd.conf"のようにするとフィルタのテストができる.
- "fail2ban-regex /var/log/apache2/error_log /etc/fail2ban/filter.d/apache-noscript.conf"あたりも良く使いそう.
起動のテスト
fail2ban-clientを直に叩いてみる.
/usr/bin/fail2ban-client start
WARNING 'action' not defined in 'php-url-fopen'. Using default value
ERROR  Error in action definition
ERROR  Errors in jail 'php-url-fopen'. Skipping...
[ツッコミを入れる]
2012-07-20(Fri) 編集
[Windows 7 (64bit)][Troubleshooting][diskpart][bcdedit][bootrec][boot][Windowsお引っ越し] Windowsのブート設定を修復する(ボリュームラベルを修復する,アクティブフラグの確認,ブートローダの再インストール)
Windowsのブートローダ(ブートマネージャ)が壊れたり,HDDの引っ越しをしたりすると,Windowsが起動しなくなることがある.Windowsのインストールディスクを使う事で,ブートローダの修復ができる.
Windowsのインストールディスクを入れて,インストーラを起動する.最初の画面で,システムの修復を選ぶ.自動修復が試みられる.それでうまく行かなかった場合は,コマンドプロンプトより修復を選び,以下の作業を行う.
ボリュームラベルを修復する
隠し領域が先頭にあると,その領域がCドライブ,WindowsをインストールしたドライブがDドライブになってしまう.
diskpart
select disk 0
detail disk

# システムで予約済みドライブ(volume 1)をなしに
select volume c
remove letter=C

# E(volume 2)をCに
select volume e
assign letter=c

# F(volume 3)をEに
select volume f
assign letter e

# G(volume 4)をFに.volumeの指定は番号でもOK
select volume 4
assign letter F
activeフラグを立てる
# Diskpartの起動
C:\>diskpart

# diskの選択
DISKPART> list disk
 (snip)
DISKPART> select disk 0
ディスク 0 が選択されました。

# partitionの選択
DISKPART> list partition
  Partition ###  Type                Size     Offset
  -------------  ------------------  -------  -------
  Partition 1    プライマリ           94M     31KB
  Partition 2    プライマリ           78G     94MB

DISKPART> select partition 2
 パーティション 2 が選択されました。

# Diskの詳細確認
DISKPART> DETAIL Disk
 ディスク ID:
種類
…
ブートディスク:いいえ
ページファイルディスク:いいえ
休止状態ファイルディスク:いいえ
クラッシュダンプディスク:いいえ
クラスター化ディスク:いいえ

Volume Ltr Label Fs Type Size Status Info
-----------------------------------------------
   Volume 1 D "  " NTFS Partition 94MB 正常
*  Volume 2 C "  " NTFS Partition 78GB 正常

*がついているのは,現在選択しているパーティションの様だ.

# partitionの確認
DISKPART> DETAIL partition
パーティション2
種類:07
隠し属性:いいえ
アクティブ:いいえ
オフセット(バイト):98703360

  Volume  Ltr Label Fs Type Size Status info
  Volume2 C   "  " NTFS Partition 78GB 正常
DISKPART> active
DiskPart は現在のパーティションをアクティブとしてマークしました。

DISKPART> exit
 DiskPart を終了しています...
ブートローダの修正と確認
C:\>bootrec /fixboot
操作は正常に終了しました。
C:\>bootrec /fixmbr
操作は正常に終了しました。
# ブートマネージャの確認
C:\bcdedit

Windowsブートマネージャー
------------------------
identifier {bootmgr}
device partition=C:
path \bootmgr
description Windows Boot Manager
locale ja-JP
default {default}
displayorder {default}
timeout 30

Windowsブートローダー
------------------------
identifier {bootmgr}
device partition=C:
path \Windows\system32\winload.exe
description Windows 7 Enterprise (回復済み)
locale ja-JP
recoverysequence {b18-----18}
recoveryenabled Yes
osdevice partition=C:
systemroot \Windows

C:\>exit
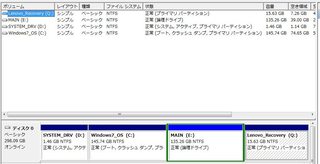
これで再起動するもダメ.正しくブートするWindowsマシンの「コンピュータの管理」から「ディスク構成」を見ると,OSがインストールされているパーティションにactiveフラグを立てるんじゃなくて,Windows7インストール時に作成されるシステム領域にactiveフラグを立てる必要があるようだ.
C:\>diskpart
DISKPART> select disk 0
DISKPART> select partition 1
パーティション 1 が選択されました。
DISKPART> active
DiskPart は現在のパーティションをアクティブとしてマークしました。
DISKPART> exit

C:\>bootrec /fixboot
操作は正常に終了しました。
C:\>bootrec /fixmbr
操作は正常に終了しました。
# ブートマネージャの確認
C:\bcdedit

Windowsブートマネージャー
------------------------
identifier {bootmgr}
device partition=D:
path \bootmgr
description Windows Boot Manager
locale ja-JP
default {default}
displayorder {default}
timeout 30

Windowsブートローダー
------------------------
identifier {bootmgr}
device partition=C:
path \Windows\system32\winload.exe
description Windows 7 Enterprise (回復済み)
locale ja-JP
recoverysequence {b18-----18}
recoveryenabled Yes
osdevice partition=C:
systemroot \Windows

C:\>exit
これで再起動するとうまくいった.ヤレヤレ.
参考ページ
- 備忘録:Windows7が起動しなくなってスタートアップ修復もできないときの対処法 - Dull as a Butterknife the Next Generation
- Windows7 でのMBR修復方法 | MEMO-LOG
正常にブートするときの各パーティションにつけられた属性

[ツッコミを入れる]


